
|
UP | |
GOOD STUFF | |
NEW STUFF | |
SEARCH |
HAND-DRAWN HOLOGRAMS(c)1995 William J. Beaty
| SPIE paper | Email discussion | FAQ (fabrication hints) | Other instances | Not true holograms? I've stumbled across a technique for drawing holograms directly upon a plastic plate by hand. It sounds impossible, but I've been sitting on the livingroom sofa making holographic images of floating polyhedra, words, 3D starfields, opaque objects, etc. No laser, no isolation table, no darkroom, no expensive film plates. This takes nothing more than a compass and some scraps of plexiglas. Too cool, if I say so myself!
There's an interesting story behind this technique, but first, the
instructions.
Obtain a small piece of acrylic plastic and a good, non-wobbly set of
"dividers" (a compass with two points.) I used a $10 compass from an art
supply store and replaced the pencil lead with the supplied metal point.
The compass must be the type with an adjusting screw to set the spacing of
the points. Or, you can use a 4-in. piece of wood with a couple of
finishing nails driven through it to form a pair of points.
Next, use a marker to draw a simple pattern such as the letter "V" near
the lower edge of the plate. This will be the image that we'll encode
onto the surface. Draw your "V" about 1 in. tall (2cm). Set the spacing
of the compass points to a couple of inches. Place one point on the tip
of the small "V" at the bottom of the square, and *gently* drag the other
point lightly across the plastic so you make an arc-shaped scratch that
looks something like the figure below.
[BETTER
IMAGES]
This is your first scratch. It helps to tilt the compass so the point
trails across the surface and does not dig in or chatter. The scratch
should be easily visible, but not extremely deep.
When viewed with both eyes open, the "V" seems to float deep within the
plastic. Its virtual depth is determined by the compass: if the spacing
of the points was set to 1 in., the image appears 1 in. below the plastic
surface. You can also hold the plate upside down, with the scratches at
the edge of the plate towards your body, and the holographic image will
float in space above the plate.
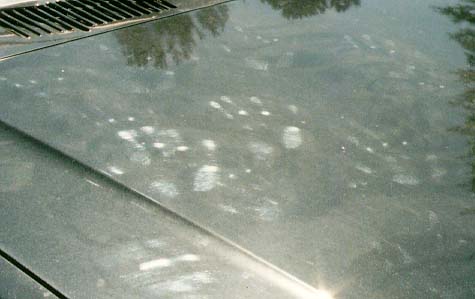
Several hologram plates. (Obviously you cannot see the 3D effect in this flat photograph.) Depending on the tilt of the plate with respect to the sun, you might accidentally discover the "pseudoscopic" image of the "V," and it may appear to float *above* the surface of the plastic. Tilt the plate to bring the far edge up and towards you and you'll then find the "orthoscopic" image floating deep within the plate.
If you had inscribed your entire name on the plastic, you'd now be seeing
it down there within the surface. (hint hint!) It's also possible to draw
complicated 3D objects by varying the compass spacing as you slowly draw
glowing lines one point at a time. The distance between the compass
points controls the depth of the hologram-dots you are making. I've been
drawing cubes, pyramids, and holes with glowing stars at the bottom. As
with conventional holograms, opacity effects can be achieved by
controlling the location of the endpoints of the scratches. And many
other sophisticated effects produced by conventional rainbow holography
can be duplicated in black plastic and scratch patterns.
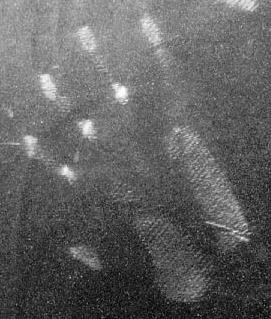
CHANCE FAVORS THE *CURIOUS,PLAYFUL* MINDAll this all started while I was walking along the rows of cars in the parking lot at work. I noticed this one black station wagon hood that had a number of glowing highlights created by the sunlight. Typical science hobbyist response: I stopped and began playing with them. I was moving my head back and forth in order to make them slide around, when I noticed that some of the highlights seemed to exist a few inches WITHIN the surface of the car hood. I've long been interested in stereo images, so I started examining these "deep" highlights in detail. Some of the larger ones had an interesting structure, appearing as an 8 in. circular blotch of light with a radial pattern of filaments and a mottled central area. All these highlight-patterns seemed identical, and were floating at various depths within the car hood.Gritty car hood after careful "polishing" with a dry paper towel. The handprints in the above photo might appear to be on the surface of the hood, but in real life they look holographic and seem to float about one foot deep within the surface of the hood. Looks like white fish in a dark pond. With a start I suddenly I realized what I was seeing. It was incredible: each highlight was in the shape of a wool polishing mit, with matted fibers in the center surrounded by outwards-pointing wooly filaments! The matted part was in the shape of a human hand! There were several of them floating at various depths all over the car hood, with some of them even floating in space *above* the hood. They had been invisible to me, but then they weren't. Science is perception! It wasn't long before I had half the engineering department out there acting like fools, moving their heads back and forth in front of this black station wagon. I searched through the rest of the sunlit parking lot and found several other cars with glowing handprints deep within various surfaces.
I proposed several crude theories to explain the phenomena, as well as
numerous hoaxes which could be done via Elvis-shaped polishing mitts to
encode miraculous images onto everyday objects. (The Hood of Turin?) It
was about a week before I figured out what was really going on. The
images were naturally-occurring holograms. The owner of the car had
obviously polished the hood with a dirty mit, and the millions of
particles of grit in the mit traced out millions of nearly-parallel
scratches in the black paint. The particular hand motion had created a
geometry of abrasion patterns which turn out to be nearly identical to the
interference patterns which make up those embossed-foil Benton whitelight
But there was something extremely weird about the abrasion patterns on the
hood (I mean even more weird than their causing images!) These scratches
have random spacing. They seemed to be functioning as holograms without
the benefit of optical interference. This is impossible of course, since
holography is completely based upon interference effects. However, the
"Rainbow" hologram technique invented by Benton allows a hologram to
function regardless of illumination frequency. The classic single-stage
"Rainbow" holography setup includes a horizontal slit which produces
relatively large horizontal swatches of fine-line interference patterns on
the film, and these encode the depth information as variations in
orientation of the fringes across the stripe. In Benton's Rainbow
Holograms, only the fringe orientation is important. Once I was clued in
by the existence of the car-hood holograms, I realized that I could also
interpret Benton's technique as allowing holograms to function regardless
of *fringe spacing.* Frequency independence leads to size independence of
fringes. No one seems to realize that a Rainbow Hologram will still
function if the spacing of its fringes was made random. Or if it were to
be made immensely large.
(See:Are they *really* holograms?, and
No one seems to realize that the well-known "Rainbow Hologram" technique
can also let you
produce holograms which are not based on optical interference at all. It
makes it possible for you to create holograms where the
"inteerference fringes" are so large
that they are easily seen by the naked eye,;where they are more like the
grooves of an LP record than like the patterns on a CDROM. And if the
arrays of hyperbolic interference fringes in a conventional Rainbow
Hologram are replaced by widely-spaced, hand-ruled scratches on a plastic
plate, it becomes possible to draw complicated holographic images directly
by hand with a sharp tool. Multiple parallel scratches aren't necessarily
required, and circles can replace the hyperbolae. The circular-scratch
technique is able to produce holographic images, and sweeping circular
motions of gritty polishing mits can produce these holograms accidentally.
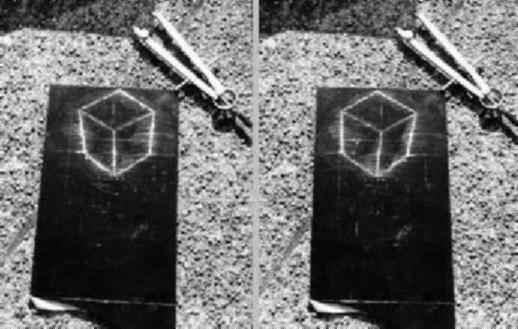
(STEREO PAIR, for crosseyed viewing)
Has anyone heard of this trick before? I've yet to find it mentioned in
any holography article or text. It's starting to look like this is
something new...
(AHA! Someone clued me in. A 1992 paper by Plummer & Gardner (ref. below) details just such a discovery. The authors completely analyse the math behind the reflections made by arrays of circular scratches produced by the orbits of a lapping tool on a metal mirror. -Bill B., 10/23/95The scratch-hologram technique might be very useful in reducing the amount of data required for computer-generated holography. The size independence characteristic suggests that billboard-sized holograms wouldn't be impossible to build. Also, an incoherent-light holo-camera is feasible: if an object is illuminated with structured light resembling a dense random starfield and is photographed at 2f distance by a camera having a curved slit-aperature over its lens, and if the resulting plate is used to etch fine lines onto a metal or plastic surface, the result will be a photographically produced "scratch hologram" of the original object.
Conventional Rainbow Embossed holograms do trounce it badly in the
brightness and sharpness catagories, but conventional techniques won't let
you create a "physics demo" hologram with giant interference fringes
easily viewed with the unaided eye. And conventional holography won't let
you sit by the side of a lake in Vermont with plexi and dividers, drawing
holographic virtual images of floating polyhedra by hand.
- Bill Beaty billb@eskimo.com
P.S. The required tools are so simple that primitive peoples could have
drawn these images in hardened sooty resin pools with wooden tools, had
they but known the trick. Several ancient civilizations were heavily into
geometry. I wonder if any artifacts exist in storage somewhere which
appear to have some 'sandpaper marks' on their polished surfaces... ;)
LOOKING FOR BOOKS? Try searching amazon.com: (try "science fair" too) Help Support the Science Club, use the above form to buy your books. (We make a few $$ on any books ordered via these links.)
REFERENCES
Nils Abramson, Incoherent
Holography, Proc. SPIE Vol. 4149, p.
153-164, Holography 2000, Tung H. Jeong; Werner K. Sobotka; Eds.
W. Plummer & L. Gardner, Applied Optics, V.31 No.31, Nov. 1992,
pp. 6585-6588,A mechanically generated hologram?,
E. Garfield, Essays of an Information Scientist, V5 pp348-354 1981-82
ISI's
"World Brain" by Gabriel Liebermann: The World's First Holographic
Engraving (3ft x 4ft scribed aluminum)
Jearl Walker, WHAT DO PHONOGRAPH RECORDS HAVE IN COMMON WITH WINDSHIELD
WIPERS? The Amateur Scientist, Scientific American. July 1989 Vol261 No1.
pp106-109
"A Binocular Illusion" by Paul Kirkpatrick in American Journal of Physics.
Vol. 22, No 7. Page 492. October 1954.
"Reflections on a gramophone record" by J.B. Lott in Mathematical Gazette.
Vol. 47, No. 360. Pages 113-118. May 1963.
F. S. Yu, A. Tal, H. Chen, Optical Engineering, Vol.19 No.5,
pp. 666-678, "One-step rainbow holography: recent development
and application."
W. Siemens-Wapniarski, M. Givens, Applied Optics, March 1968,
vol 7 no 3, p535 "Experimental Production of Synthetic Holograms."
H. Caulfield, National Geographic, Vol.165, No.3, p. 372
Homemade (laser) Holograms : The Complete Guide to Inexpensive,
Do-It-Yourself Holography
The Complete Book of Holograms : How They Work and How to Make Them
Holography Handbook : Making Holograms the Easy Way
ALSO: the hand-drawn hologram project now appears in: Yesmag Science Magazine, #9, Spring '98 p25...and was featured in an old episode of "The Big Bang", a children's science TV show in the UK. |
http://www.amasci.com/amateur/holo1.html
Created and maintained by Bill Beaty. Mail me at: billb@eskimo.com.
If you are using Lynx, type "c" to email.