To Do and Notice: Making a Pinhole Viewer
You can make a simple pinhole viewer that lets you see the images carried by light shining through a pinhole. All you'll need is:
-
an empty cereal box or laundry detergent box that is at least 12 inches tall
-
waxed paper
-
black tape or silver duct tape
-
an X-acto knife, a single-edged razor blade, or scissors
-
a pushpin or thumbtack
Making a pinhole viewer 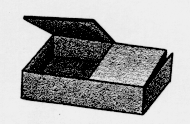 If you re using a cereal box, remove the lining. Cut a big flap in the front of the boxÑcutting across the middle down one side, and across the bottom. If you re using a cereal box, remove the lining. Cut a big flap in the front of the boxÑcutting across the middle down one side, and across the bottom.
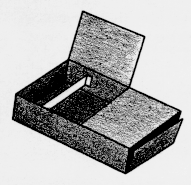 Cut a piece of waxed paper that's as wide as the bottom of the box but a few inches longer. Tape it inside the box as shown, about two inches from the bottom of the box. Cut a piece of waxed paper that's as wide as the bottom of the box but a few inches longer. Tape it inside the box as shown, about two inches from the bottom of the box.
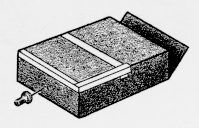 Use your pushpin or thumbtack to make a hole in the bottom of the box. Then close the flap and tape it back in place with black tape. Be sure to tape all around the flap so that no light can leak into the box except through the hole in the bottom. Use your pushpin or thumbtack to make a hole in the bottom of the box. Then close the flap and tape it back in place with black tape. Be sure to tape all around the flap so that no light can leak into the box except through the hole in the bottom.
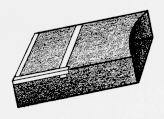 Cut off the flaps from the top of the box. Cut a slight curve along one edge where you removed the boxtop, so that the curve of the box more or less matches the curve of your forehead. You may also want to use the black tape to make a flexible flap along the edges where you removed the boxtop and the flaps. This will help block out light. Cut off the flaps from the top of the box. Cut a slight curve along one edge where you removed the boxtop, so that the curve of the box more or less matches the curve of your forehead. You may also want to use the black tape to make a flexible flap along the edges where you removed the boxtop and the flaps. This will help block out light.
Using the pinhole viewer 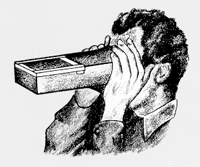 We found that the pinhole viewer works well outside on a sunny day. Look into the opening in the top of the box, squeeze the box so it fits tightly around your face, and use your hands to block light leaking in from around your face. You'll see an upside-down and backward image of the scene in front of you on the waxed paper screen inside the box. We found that the pinhole viewer works well outside on a sunny day. Look into the opening in the top of the box, squeeze the box so it fits tightly around your face, and use your hands to block light leaking in from around your face. You'll see an upside-down and backward image of the scene in front of you on the waxed paper screen inside the box.
If you make the hole bigger, the image will get brighter, but also more blurry. If you make more than one hole in the bottom of the box you'll get more than one image.
What's going on How does a pinhole let you see the images carried by light? And why are these images upside-down and backward?
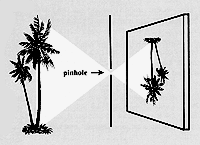 The simplest way to understand pinhole images is to take a look at what happens to light rays reflecting from an objectÑlet's say a tree that vou are looking at with your pinhole viewer. Sunlight bounces off the leaves, the trunk, the ground beneath the tree. A pinhole lets through only a portion of these reflected light rays. Most of the light that reflects from the tree is blocked bv the cardboard surrounding the pinhole. Only a few of the rays of light that bounce off a particular leaf are heading in just the right direction to shine through the pinhole of your viewer. Light rays from leaves at the top of the tree must slope down at a steeper angle to pass through the pinhole. These rays hit the bottom of the screen. Rays of light from the base of the tree trunk must slope up to pass through the pinhole. These upward moving rays will hit the top of the screen. Think about this: if the rays from the top of the tree hit the bottom of the screen, and the rays from the bottom of the tree hit the top of the screen, then seems like you should see an upside-down picture of the tree on your screen. (And you do!) The same logic applies to right and left so that the image is also reversed this way. The simplest way to understand pinhole images is to take a look at what happens to light rays reflecting from an objectÑlet's say a tree that vou are looking at with your pinhole viewer. Sunlight bounces off the leaves, the trunk, the ground beneath the tree. A pinhole lets through only a portion of these reflected light rays. Most of the light that reflects from the tree is blocked bv the cardboard surrounding the pinhole. Only a few of the rays of light that bounce off a particular leaf are heading in just the right direction to shine through the pinhole of your viewer. Light rays from leaves at the top of the tree must slope down at a steeper angle to pass through the pinhole. These rays hit the bottom of the screen. Rays of light from the base of the tree trunk must slope up to pass through the pinhole. These upward moving rays will hit the top of the screen. Think about this: if the rays from the top of the tree hit the bottom of the screen, and the rays from the bottom of the tree hit the top of the screen, then seems like you should see an upside-down picture of the tree on your screen. (And you do!) The same logic applies to right and left so that the image is also reversed this way.
The tree has more points than the top and bottom. The same rules apply to light rays reflecting from every point on the tree's leaves and trunk: only the light rays that are heading in just the right direction will pass through the pinhole. On the other side, these rays of light line up geometrically to make an upside-down and backward image of the tree.

Science Learning Network / Inquiry Resources / © Exploratorium
|
